How to Become a Chatbot Ninja in 7 Days
Module 3: Lesson 3.5. eCommerce & In-App Stripe payments
Lesson 3.5. eCommerce & In-App Stripe payments
The ability to use the Stripe payment platform INSIDE messenger is pretty awesome in itself. Unfortunately it was only possible to create single item purchases with the use of Cards or Gallery items inside ManyChat.
We changed that by accumulating order details in custom fields and sending this data to a PHP file, then we retrieve it back and create a whole new buy button from the Dynamic Response (think of the awesome possibilities if you combine this with the dynamic coupon) option.
What you’ll need is this:
- a little scripting in PHP;
- some of ManyChat’s awesome Dynamic Content actions.
Ready? Let’s go...
Creating the flow in ManyChat
Note that this lesson is about accumulating items and order amounts to be able to create 1 button to pay with Stripe for more than just 1 items as is the default. It's not an ecommerce/Add-to-Cart lesson.
In this lesson we will create some messages where we will ask the user for input on their desired order.
I use a simple version with buttons in this particular lesson, but you can make some cool variations once you know how to set this up. For example you may use carrousel cards with single images per item to order and add them to card from there. It's important that you know how this works first though. I may create a bigger, nicer ecom version in the user cases module where you can add more of the same items, cancel items and cool stuff like that. It's all fun!

Let's take a good look at what is going on here.
First, you get prompted for a selection of a hamburger, you may then select 1 out of 3. When you did that and clicked the button, your item will be added to a Custom Field. One for the Order Amount, one for the Kind of Burger (see image).

Once done, you'll be transferred to the next step: the French Fries section. Here you will make your choice as to what size you prefer. Once again, your French Fries are added to a new Custom Field, we called the previous one food_order, so we will just call this one food_order_2. The price of the Fries are ADDED to the price we had from the Burger. The Custom Field for Order_Amount will be increased by the price of your Fries (see image).

When you have added everything like this to your custom fields, it's time to continue to the Dynamic Response field, where we will call our script again.
In this lesson we only had two things to order, so that wraps it up pretty quick, but you can of course get a lot of things in your cart (as said, more about that later as user cases)

On with the Dynamic Response to Create the Buy Button
Taken from the ManyChat Github pages, about the format of the JSON Buy button
...
{
    "type":    "buy",
    "caption": "Buy",
    "customer": {
        "shipping_address": true,
        "contact_name":     false,
        "contact_phone":    true
    },
    "product": {
        "label": "T-shirt",
        "cost": 2250
    }
}
...
shipping_address, contact_name, contact_phone fields are required to configure payment form product.cost should be set in cents (for example cost value of $22.5 must set to 2250); buy button can only be used after Stripe account is connected in ManyChat settings. This button is in Beta mode.
Creating the Dynamic Response message
The same as in the previous lesson, this is how we include a Dynamic Response message. The script always start with the same code, to read the Body Request data. This might look difficult at first but you will soon realize that all you have to do is copy that same snippet over and over again. Even though I am doing this kind of work for over two decades now, I'm not a programmer and I don't think we all need to know why it does what it does, as long as you get a good, safe and secure result without breaking things.
The Dynamic Response and PHP file creation go kind of hand-in-hand. We talk about the PHP script after this section, but you will soon notice you will shift back- and forward between these sections as you'll need both to actually create and test. Just so you know!
Click the Dynamic Response icon as shown in the image here. Then select the message box/field to enter your data.

At the Request URL form field, put in the location of the PHP file on your server.
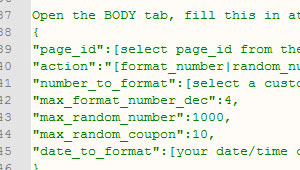
Next, select the BODY tab below the Request URL form and put in the data as diplayed in the image below.

Click the Test the Request link on the Right and see if you get a result

The Response Body content should look like this:
{
    "version": "v2",
    "content": {
        "messages": [
            {
                "type": "text",
                "text": "Awesome, let's pay for your delivery, Paul"
            },
            {
                "type": "cards",
                "elements": [
                    {
                        "title": "Yeeaah, Food!",
                        "subtitle": "Here's what you ordered:\n\rSuper Burger\n\rLarge Fries\n\rTotal amount due: $10.00",
                        "image_url": "http:\/\/via.placeholder.com\/900x900",
                        "buttons": [
                            {
                                "type": "buy",
                                "caption": "> Pay Now <",
                                "customer": {
                                    "shipping_address": true,
                                    "contact_name": true,
                                    "contact_phone": true
                                },
                                "product": {
                                    "label": "FoodApp",
                                    "cost": 1000
                                }
                            }
                        ]
                    }
                ]
            }
        ]
    }
}
Several fields (the custom fields) are still empty in the sample above. Don't let that scare or fool you. It just means we haven't run the flow yet. If you are already getting these great responses, you're 90% there;-)
Creating the PHP File
The PHP file for this lesson is actually pretty simple. All it does it retrieve the information as sent by ManyChat and make it into a JSON code to create the Buy Button.
There is one thing to take into consideration: for the Buy Button to work, you MUST use a Gallery or Card item.
So now that you have the PHP script ready as well. It's time to test it all. If you took the right steps, this is what you did:
- Created the flow
- Created your PHP file and uploaded it
- Ran a preview of your flow at least once to make sure all custom_fields are set
Important: If you followed the steps correctly and are still not seeing the Stripe payment window, make sure you already have Stripe set up in your account.