How to Become a Chatbot Ninja in 7 Days
Module 1: Lesson 1.5.3. Other Growth Tools
Lesson 1.5.3. Other Growth Tools
Aside from the Overlay and Embeddable Widgets, there are several other Growth Tools. These are:
- Landing page
- Messenger Ref URL
- Facebook Ads JSON
- Facebook Comments
- Facebook Messenger Code
- Customer Chat
- Checkbox
Introduction
To set up any new growth tool, you First click the "New Growth Tool" in the upper right corner of the Growth Tools Section.

1. The Landing page
If you do not have your own hosting space/website, but DO want to send your visitors to an opt-in page, you can use the ManyChat Landing page. Select Landing Page from the Other Growth tools section. You are now entering the configuration section, of which I recommend you just start playing around with. In the initial state, you set up what users see when they enter your landing page. It's the First page they see after going to your website when they clicked a link on an ad for example. You can use an overlay color, a background image or video and different colors and placement of text.
When done, you go to the Submitted state, which is what people see after they clicked your Send to Messenger button. Now, if they choose to View it in Messenger, they will see the Opt-In message you set up in step 3. It can be a new message you create in the section (click edit), or an existing flow (click replace). You may also choose to enroll your user in a follow up sequence for marketing or informational purposes in this section.
Last step is the Setup. You will get a URL to which you need to link your Ad. A nice extra feature is the ability to enter your Facebook Pixel here, so you can track your users to create your Facebook Audience and retarget or setup Events to measure your success.
2. Messenger Ref URL
The messenger Ref URL widget is actually just a direct link to your flow. We use it all the time for our chattemplates.com business. Each template has a flow attached to it and with the Ref URL we can enable people to see a preview of the chat.
There's only 2 TABs with settings for this tool: the Opt-In actions and the Setup. In the opt-in section you will do what you always do with the growth tools, create a new flow message or attach an existing flow. After that assign the subscriber to an optional sequence.
The second TAB with settings is just to generate the URL to use. The following image will illustrate both sections.

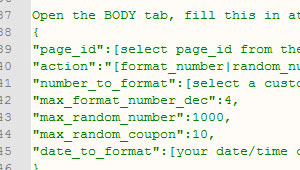
3. Facebook Ads JSON
A JSON growth tool enables you to use a custom messenger conversation to people who interact with your Facebook Ad. It's only 2 Steps to set it up, plus some copy-pasting into your Facebook Ad and Ad-level.
First, you connect a flow to your growth tool:

The next step is getting your JSON code from the Setup Tab:

When you copied your JSON code, go to your Facebook Business Manager and select the Ad you created.
In the ad (at Ad level) you will see the following section, click the JSON Tab as displayed here:

Now comes the important part! REMOVE the code you see in this JSON box and PASTE the code you just copied from your ManyChat JSON Growth tool.
Now save that Ad and you're good to go.
4. Facebook Comments
The Facebook Comments growth tool allows you to convert users who comment on a specific post into bot subscribers.
Settings
First, you select a post on your page or the post ID of an Ad you created by pressing the blue bar "Select A Post".

This will take you to a pop-up screen where you can enter, or select your post:

When you have selected or entered your post, you can continue by thinking about the keywords you seem fit to autorespond to. If you're in ecommerce, you know many people will actually say things like : i want this, i need this, where can i buy this etcetera. It might be a good idea to enter these keywords here so you can auto-reply to these with matching comments.

You might have noticed I also included some negative keywords, such as Aliexpress and Alibaba. Some people think it is cool to let others know it is available on these markets for dirt cheap, we don't need to comment/reply to those people.
Auto-Response
Now you need to set up your auto response. This is the message that you will reply with when that first keyword (e.g. "i need this") is triggered.

Op-In Actions
This next and last step is the actual messenger chatbot response sent to the user. You have three options here:

1. You do not send any message, you will just reply to all yourself;
2. You send it to everybody who comments anything in your initial response from the previous step, or
3. You only send a message to those who commented with your suggested reply (#botninja)
I will show the last step, where people replied to me with the suggested keyword.

What happens now that the user typed #botninja, is that our messenger triggers the message we set up. This is a flow you created before, or typed in this step. This is where you can ask the user if (s)he is interested in your service or product. On a positive reply, you can then send them a link to your goodies. Subscribing to a sequence is optional.
5. Facebook Messenger Code
This is a fun one and we use it a lot. On our business cards (ideal to share and show demos), for coupon scanning (see a coupon case further in the course) and all other fun things.
It does not need a lot of explaining though, other than that you have to assign a flow/sequence to the tool as with all the other growth tools. Once you did that, move on to the Setup TAB and download your messenger code.
We will do step by step user case on how to create a simple business card in another chapter. Here's a sample of our agency business card.

6. Customer Chat
The customer chat feature is mostly used for helpdesk related questions for on-site visitors. We've all seen the Live Person Chat popups for years now, this is pretty similar to those chat services. A big difference is in the marketing side of things, because of the ability to start a conversation (artificial) right away and subscribe users to sequences and follow up at a later time.
A sample of what it could look like is on this very page you're reading right now. At the lower right.

7. Checkbox
The last growth tool in this chapter is the Checkbox tool. It's an extra opt-in checkbox for users who fill in a form on your website. When you ask for a visitor's email address for example on an email pop-up box, you are now able to add this checkbox to your form and that same subscriber will also be added to your ManyChat subscribers list. Two birds with one stone so to speak ;-).
There are two steps to make this work, as well as a little customizing of your FORM submit button.
1. Opt-In Actions
Add a flow to your checkbox or create a new one.
2. Setup
The Javascript Snippet is most likely already on your page if you have used ManyChat once. If you haven't, you have to include it between the HEAD tags of your page(s).

Setting up the widget itself is easy. You just pick a size and color for your widget and copy the Embed code to place onto your website in the appropriate location.
This next part may be a little tricky if you have none/little HTML knowledge. You have to assign an action to your submit button.

An action like that in HTML may look like the sample right here:
<!DOCTYPE html>
<html lang="en">
<head>
...
  <script>
    window.mcAsyncInit = function () {
      var widget = MC.getWidget(1367347);
      var button = document.getElementById('optin-button');
      var form = document.getElementById('optin-form');

      widget.on('checked', function(event) {
        console.log('handle checked event', event);
        button.disabled = !event.checked;
      });

      button.disabled = !widget.checked;

      button.onclick = function () {
        widget.submit();
        form.classList.add('submitted');
      }
    }
  </script>
...
</head>
<body>
  <div id="optin-form">
    <button class="btn primary" id="optin-button">Confirm Opt-in</button>
    <div class="mcwidget-checkbox" data-widget-id="1367347"></div>
    <a class="btn success" id="messenger-button" href="https://m.me/2069710813264446" target="_blank">View it in Messenger</a>
  </div>
</body>
</html>
This last Checkbox Widget may be the most difficult one to understand, so my advise is to just get acquainted with everything else before you try and start with the most difficult one.